BullseyeBore CORE SUPPORT
quick start guide: setup
For models CR1-100, CR1-101, CG1-100 and CG1-101
NOTE: Appearances, features, and functionality may vary from the written instructions based on product and labeling updates. Please refer to this website for the latest information and additional details.
STEP 1: UNSCREW THE HOUSING
The housing is red or green depending on the model. Turn the power switch off and use a small Phillip’s Head screwdriver to remove the two screws that secure the outer housing to the inner body. Remove the screws.

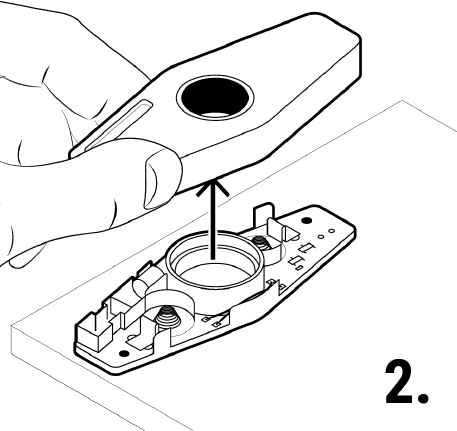
STEP 2: REMOVE THE HOUSING
Gently pull the outer housing off and away from the inner body and place the inner body on a flat surface with the lasers and exposed electronics facing up towards you. Please note that the housing can be tightly mounted to the inner body, so it's often helpful to place the unit on a flat ferrous surface and then gently pull off the housing. BullseyeBore Core's magnet should stick to the flat ferrous surface and allow the housing to be removed easier.

STEP 3: INSERT TWO LR44 OR 357 COIN CELL BATTERIES
Carefully insert two new LR44 or 357 coin cell batteries into the two battery slots. The negative side of the battery (which is the curved cap) should be oriented so it is facing down when inserted into the battery slots against the battery coils on the printed circuit board.

STEP 4: REPLACE THE HOUSING
Verify that the batteries are oriented and installed correctly. Orient the housing so that the optical window in the housing is positioned over the laser and optics in the inner body. Gently slide the housing onto the inner body.

STEP 5: SECURE THE HOUSING
Carefully turn the entire assembled unit over so the switch side of BullseyeBore Core is visible. Use a small Phillip’s Head screwdriver to replace the two screws that secure the outer housing to the inner body. Do not overtighten the screws.

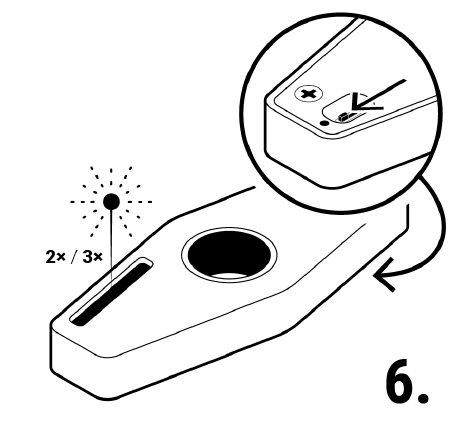
STEP 6: TURN THE POWER ON
Test the battery installation by turning on the power switch and verifying that the laser illuminates and projects two beams for models CR1-100 and CG1-100 and three beams for models CR1-101 and CG1-101.


