NOTE: Appearances, features, and functionality may vary from the written instructions based on product and labeling updates. Please refer to this website for the latest information and additional details.
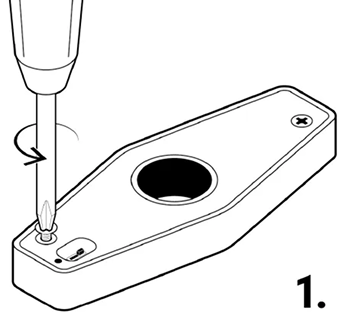
The housing is red or green depending on the model. Turn the power switch off and use a small Phillip’s Head screwdriver to remove the two screws that secure the outer housing to the inner body. Remove the screws.
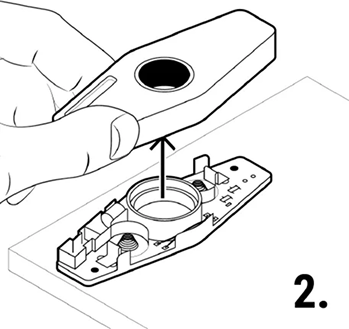
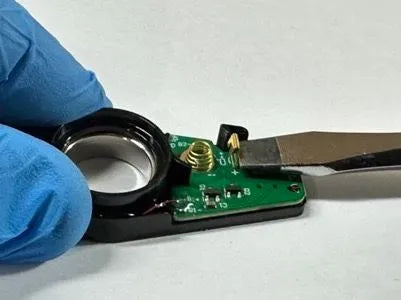
Gently pull the outer housing off and away from the inner body and place the inner body on a flat surface with the lasers and exposed electronics facing up towards you. Please note that the housing can be tightly mounted to the inner body, so it's often helpful to place the unit on a flat ferrous surface and then gently pull off the housing. BullseyeBore Core's magnet should stick to the flat ferrous surface and allow the housing to be removed easier.
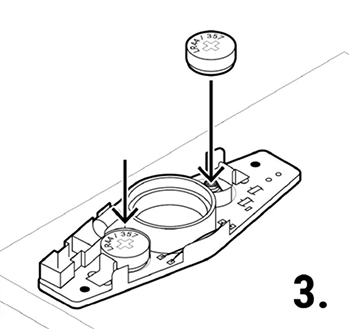
Carefully insert two new LR44 or 357 coin cell batteries into the two battery slots. The negative side of the battery (which is the curved cap) should be oriented so it is facing down when inserted into the battery slots against the battery coils on the printed circuit board.
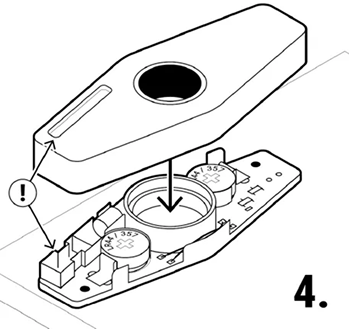
Verify that the batteries are oriented and installed correctly. Orient the housing so that the optical window in the housing is positioned over the laser and optics in the inner body. Gently slide the housing onto the inner body.
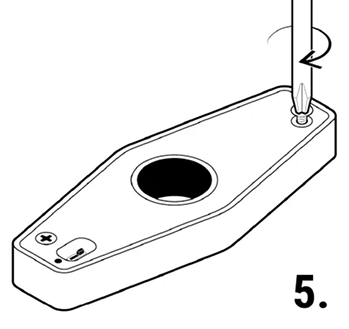
Carefully turn the entire assembled unit over so the switch side of BullseyeBore Core is visible. Use a small Phillip’s Head screwdriver to replace the two screws that secure the outer housing to the inner body. Do not overtighten the screws.
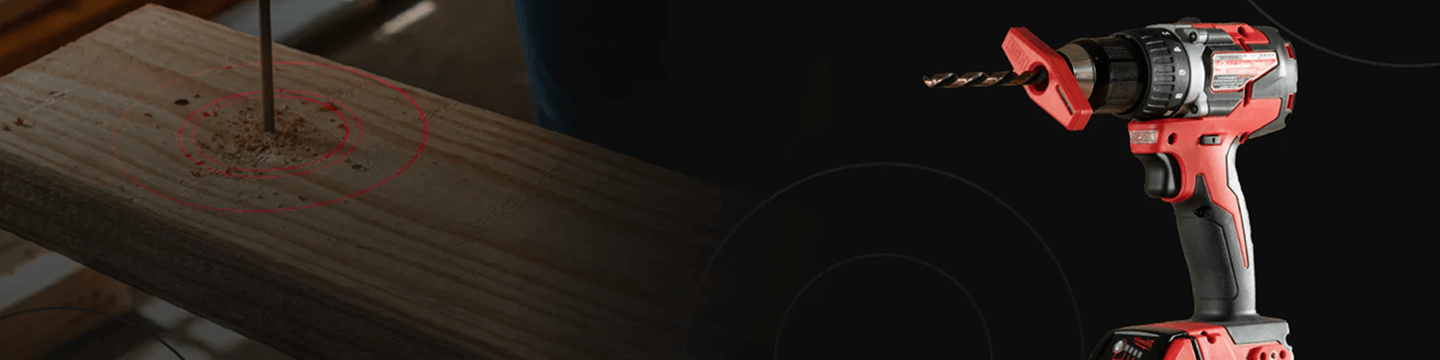
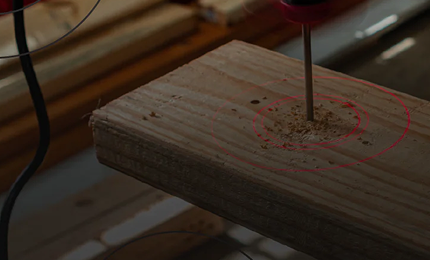
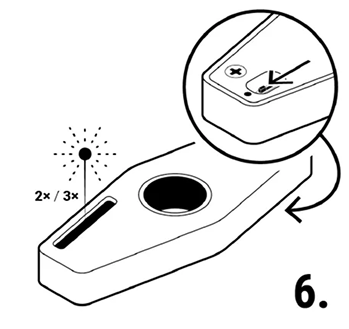
Test the battery installation by turning on the power switch and verifying that the laser illuminates and projects two beams for models CR1-100 and CG1-100 and three beams for models CR1-101 and CG1-101.
NOTE: Appearances, features, and functionality may vary from the written instructions based on product and labeling updates. Please refer to this website for the latest information and additional details.
INITIAL CHECKS: Ensure you've followed the online Setup section of the Quick Start Guide correctly. Verify you're using new batteries inserted in the proper orientation. If problems persist, you may need to inspect the battery contacts.
ROOT CAUSE: Power issues are commonly caused by bent, compressed, or distorted positive battery contacts that do not properly touch the side of the battery (causing intermittent or no electrical continuity). This can happen due to impact damage, using oversized batteries, or normal wear from extended use. The good news is this is typically easy to fix with basic tools!
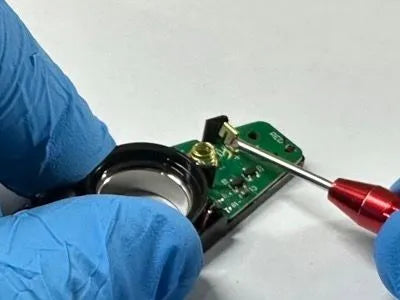
INSPECTION: Remove the housing to access the battery compartment. Look carefully at both vertical positive battery contacts that touch the sides of the batteries. Check if either or both contacts appear bent, distorted, or misaligned. Here are two common issues and solutions:
ISSUE #1: Bent Long Vertical Battery Contact Arm
Problem: The long vertical arm of the positive battery contact is bent backward, away from the battery, causing poor or no contact with the battery.
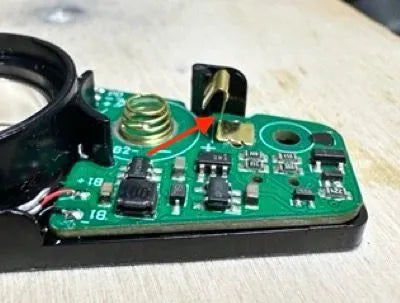
Solution: Use a small flat screwdriver or the flat front of a closed pliers. Gently bend the connector back toward the battery. CAUTION: Apply gentle, steady pressure - pushing too hard may break the connector! The goal is to bend the vertical arm back into the correct position which can be either perpendicular to the PCB or slightly angled toward the battery.
ISSUE #2: Bent or Compressed Battery Contact Short Arm
Problem: The short curved arm of the positive battery contact is bent away from the battery or compressed toward the long vertical arm. In this example, one of the two "prongs" is bent towards or compressed against the long vertical arm, but its possible for both to be bent towards or compressed against the long vertical arm.
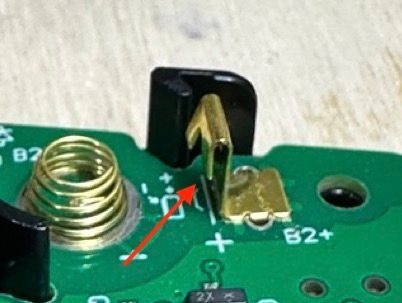
Solution: Use a small flat screwdriver or pliers. Carefully bend the short arm back toward its proper position. CAUTION: Use minimal force to avoid breaking the connector! The short arm should be positioned to maintain consistent contact with the battery.
After application of one or both of these solutions, reassemble the unit completely with the batteries installed properly and test. The repair is successful when the laser functions continuously without flickering or intermittent operation.
Since BullseyeBore Core is built with tight tolerances, the housing can be difficult to remove from the inner body. The easiest way to separate the housing from the inner body is by simply removing the screws, placing the unit on a flat ferrous surface, and gently pulling off the housing. BullseyeBore Core's magnet should stick to the flat ferrous surface and allow the housing to be removed easier. For specifics on this, please see step #2 in the online Setup section of the Quick Start Guide.
BATTERIES: When the batteries become depleted the laser shifts to a very low power mode and becomes dim. A dim laser requires replacement with new batteries. For specifics on battery replacement, please see the online Setup section of the Quick Start Guide.
INTERNAL OPTICS: The internal optics may also become covered with drilling related dust. There are two internal optics in the Cx1-100 models and three in the Cx1-101 models. Please use compressed air or a microfiber cloth to clean them. Alternatively, you can use a cotton swab (like a Q-Tip) lightly coated with isopropyl alcohol and gently clean the front surface of each internal optic.
EXTERNAL OPTICS WINDOW: The external optics window in the outer plastic housing may also become covered with drilling related dust. It can be cleaned with a combination microfiber cloth and water. You will need to clean both sides. However, please DO NOT use isopropyl alcohol on the external optics window in the outer plastic housing because it is acrylic and will be permanently damaged by isopropyl alcohol.
BullseyeBore Core and the accessories were designed with the goal of working with most common standard electric drills and drill chucks, but due to the vast number of drill and chuck combinations, some careful user testing is required prior to use. Please note that some drill chucks may not operate with BullseyeBore Core due to their size, shape, or material.
Before using BullseyeBore Core in a drilling operation for the first time, it is recommended that you perform rotational testing within a safe and small enclosed area. For more guidance on rotationally testing BullseyeBore Core with a given drill, please see the Rotation Testing item of the Safety Guidelines.
For more guidance on drill and drill chuck compatibility, please see the Drill Compatibility section in the online BullseyeBore Core FAQ.
NOTE: Appearances, features, and functionality may vary from the written instructions based on product and labeling updates. Please refer to this website for the latest information and additional details.
BullseyeBore Core should be kept free from debris and any liquids. The best method to clean BullseyeBore Core is with compressed air or optionally with a clear microfiber cloth.
For removal of normal non-metallic drilling debris, please remove the housing from the inner body and remove the batteries. Use compressed air to clean the inner body and housing. After compressed air cleaning, optionally use a damp microfiber cloth to gently clean the housing optical window in the housing and if necessary, the individual small internal optics in the inner body. There are two internal optics in the Cx1-100 models and three internal optics in the Cx1-101 models. Alternatively, the internal optics may be gently cleaned with a cotton swab coated with isopropyl alcohol. Please use extreme caution when cleaning the internal optics as they can scratch easily! Further, isopropyl alcohol should NOT be used on the housing optical window or on the laser module lens, as it will destroy both!
The internal magnet in BullseyeBore Core can attract metallic shavings and debris. Such debris should be removed as soon as possible since it can scratch and cause excessive wear to any portion of BullseyeBore Core. The most optimal method to remove metallic debris is also with compressed air. This should be done by positioning the fully assembled unit over a metallic debris connection container and using compressed air to blow the metallic debris off the unit and into the container. If metallic debris gets into the inner body or directly onto the magnet, compressed air can be used to remove it, but please use extreme caution when cleaning the inner body optics as they can scratch easily!
Always store BullseyeBore Core in a secure case such as the BullseyeBore Core protective EVA case. Please be extremely cautious of the BullseyeBore Core Product’s neodymium magnetic forces during handling, usage and or storage. For extended storage, please remove the batteries from BullseyeBore Core.
NOTE: Appearances, features, and functionality may vary from the written instructions based on product and labeling updates. Please refer to this website for the latest information and additional details.
All BullseyeBore Core Products include a Limited 1-Year Product Warranty covering manufacturing defects when purchased from an authorized reseller. Certain exclusions and conditions apply. Please see the Warranty page for exclusions and conditions.